Making Actions
Because Textwell is just a single text box actually, its high customizability is the premise of convenience. Textwell has some pre-installed useful actions, but they are no more than examples. Adding new actions or modifying the existing actions to make them fit different user contexts is truly expected in the design concept of Textwell.
Frankly, actions run by JavaScript, so that making actions is not a big deal for those who can write JavaScript. When a user chooses an item in the action list, the built-in browser, which is called "web view," opens in front of the main text view, then the specified JavaScript source is loaded and executed in the web view.
- Add a new action
- The mechanism of action
- Visible and Translucent Mode
- T object's members
- T() function
- Basic Tutorial
- Delegating an action to your online webpage
- Debugging Actions
Add a new action
To add a new action to your Textwell, tap the "+" button at the bottom of the action list view, then select "Action." On the opened action composer, specify title, icon, source, confirm, platform, and description.
- Title
The title of the action. Title doesn't affect the functionality of an action, so you can name it as you like. Titles will be shown in the action list. - Icon
You can choose an icon for the action by selecting one from the pre-defined icon list. Icon doesn't affect the functionality of an action. It's just for a visual hint for the functionality. - Source
The source specifies the functionality of an action itself. You can write JavaScript directly on the source view, but also you can write HTML (which can include script elements) on it. Some specific objects, properties, and functions which can be used in your code for making great actions are described in the following sections. - Confirm
If this boolean parameter is set as "ON," Textwell shows a confirmation dialog when a user chooses the action from the action list. The confirmation dialog provides a chance for users to cancel executing the action. - Platform
Platform which an action can be used for: All, iPhone/iPad, or Mac. - Description
You can write a description about the action. The written description can be shown in a message dialog by a user tapping little "i" button on each action item in the action list.
The mechanism of action
An action is a JavaScript program which runs in the built-in web view. Actions can do anything that can be done with JavaScript and browser - processing strings, calculating, showing a dialog, jumping to a webpage, opening/sending data to another app, manipulating DOM, or something done by combining them. If you are showing your own user interface elements or contents in the web view, you should turn the translucent parameter OFF, so that users can see them.
While the web view is shown (either translucent is off or on), users can stop the action and close the web view by tapping the close button (with "X" icon).
For the source of an action, you can write JavaScript directly, but also you can write HTML (which can include script elements).
For example, on the source editor (Action list > "+" button > select an action > "Source"), both of the next two sources are valid.
Writing JavaScript directly
var message = 'Hello';
alert( message );
Writing HTML
<html>
  <head>
    <title>My Action</title>
  </head>
  <body>
    <p>This is my action.</p>
    <script>
        var message = 'Hello';
        alert( message );
    </script>
  </body>
</html>
In general, actions are designed to handle the text on the main text view because it is the only reasonable meaning of existence of actions. To handle the text on the main text view, Textwell's web view allows you to make interactions for getting data from the text view to let it be processed by JavaScript and setting data back to the main text view as the result of the action.
To input some data from the text view to your JavaScript, the web view has a global variable named "T". The T object is automatically generated when an action is executed, so that your JavaScript can get some data from the main text view via the preset members of T object. See "T object's members" for more information about the members of T.
To output some data back to the main text view, the web view has a global function named "T()". Using T() function is the only way to close the web view from your code and to reflect the changes to the content of the main text view. T() function takes several kinds of arguments for making different results against the main text view. See "T() function" for more information about the arguments for T() function.
Visible and Translucent Mode
The built-in web view has two visual conditions, visible and translucent. Actions which are to be processed quickly and no user interaction is needed, like pre-installed "bullet" action, they should be done translucently. On the other hand, actions which need interactions with a user, like pre-installed "Reorder" action, they should be done visibly to provide their own HTML-based user interfaces.
Textwell's action engine automatically judges and applies its mode, as visible or translucent, by a simple algorithm. As mentioned above, the action source can be written by two ways - JavaScript directly (without <script> tag) or HTML. So, If the source is written by JavaScript directly, the web view is going to be translucent. If the source is written by HTML, the web view is going to be visible.
Either way, you can programmatically switch the mode from one to the other by calling T.translucent() method.
In addition, if the action source is written by HTML but you want to make the web view translucent from the beginning, you can do it by placing "textwell" meta element with its content attribute set to "translucent=1".
<!DOCTYPE html>
<html>
<head>
<meta name="textwell" content="translucent=1" />
....
When the Textwell's action engine loads the source and finds this meta element, it makes the web view start in translucent mode.
T object's members
T.text
String
T.text represents the entire text on the main text view.
T.whole
String
T.whole represents the entire text on the main text view if there is no selection. If there is a selection on the main text view, T.whole represents the selected text.
T.current
String
T.current represents the text of the current line which the caret is now on if there is no selection. If there is a selection on the main text view, T.current represents the selected text.
T.range
Object
T.range represents the range of current selection as a range object.
range object:
{ loc: [location], len: [length] }'loc': Number
'len': Number
A range object has two properties, "loc" and "len". For example if there is a selection on the main text view, and the selection is from the location 0 (beginning of the text) with the length of 5 characters, T.range will be { loc: 0, len: 5 }. Or if the caret is between the third character and the fourth character with no selection, T.range will be { loc: 3, len: 0 }.
T.wholeRange
Object
T.wholeRange represents the range of T.whole as a range object. If there is no selection, it will be the range of the entire text. If there is a selection, it will be the range of the selection (same as T.range).
T.currentRange
Object
T.currentRange represents the range of T.current. If there is no selection, it will be the range of the current line. If there is a selection, it will be the range of the selection (same as T.range).
T.selectedText
String
T.selectedText represents the currently selected text. If there is no selection on the main text view, T.selectedText will be a empty string.
T.data
Object
T.data represents the stored data which is set by T.setData() function. See "T.setData()" for more information.
T.device
String
T.device represents a type of current device such as "iPhone", "iPad", "iPod touch", or "Mac".
T.line( index )
Returns: String
index: Number
T.line() returns the text string which is contained in the line of specified index. For example, T.line( 2 ) returns the text from the second line of the main text view.
T.lines( fromIndex, toIndex )
Returns: String
fromIndex: Number
toIndex: Number
T.lines() returns the text string which is contained in the lines between specified fromIndex and toIndex. For example, T.lines( 2, 4 ) returns the text within the range from the second line to the fourth line. The toIndex can be "null" for the meaning of the last line. For example, T.lines( 2, null ) returns the text within the range from the second line to the end of the content.
T.char( index )
Returns: String
index: Number
T.char() returns the single character which is on the specified index of the entire content. For example, T.char( 2 ) returns the second character of the main text view.
T.chars( fromIndex, toIndex )
Returns: String
fromIndex: Number
toIndex: Number
T.chars() returns a text string within the range from the index of fromIndex to the index of toIndex. For example, T.chars( 2, 4 ) returns the text within the range from the second character to the fourth character. The toIndex can be "null" for the meaning of the last character. For example, T.chars( 2, null ) returns the text within the range from the second character to the end of the content.
T.title( title )
title: String
T.title() sets the document.title on the fly. The document.title will appear on the navigation bar of the web view.
T.translucent( bool, callbackFn )
bool: Boolean
callbackFn: Function
T.translucent() sets the translucent parameter of the web view from your code. If bool is set as true, the web view gets translucent. This function affects asynchronously, so that you should set callbackFn for something should be done after the changing translucent condition is completed.
T.setData( name, value, callbackFn )
name: String
value: Object, Array, String or Number which can be serialized as JSON
callbackFn: Function
T.setData() sets some custom data under T.data. T.data can be used like a session storage. For example, T.setData( 'name', 'John' ); sets an object { 'name': 'John' } as a member of T.data. You can get this data as T.data[ 'name' ]. T.setData() sets data asynchronously, so that you should set callbackFn for something should be done after setting data is completed.
T.closelets( arrayOfCloseletObject, callbackFn )
arrayOfCloseletObject: Array
callbackFn: Function
T.closelets() registers a set of optional functions which can be executed when the user taps the close button of the web view. If some functions (closelets) have been registered, a menu for the closelets appears on the screen when a user taps the close button, then the user can choose one to execute it before closing the web view, or the user can choose to close the web view without executing any closelets by tapping "Close". The arrayOfCloseletObject is an array of closelet objects. Each closelet object should have three members with specific keys such as "title," "fn," and "arg."
closelet object:
{
  'title': [title of closelet],
  'fn': [closelet function],
  'arg': {
    key: [value]
  }
}
'title': String
'fn': Function
'arg': Object which can be serialized as JSON
The title will be the label on the button in the closelet menu. The fn is a function which will be executed if the user chooses that closelet from the closelet menu. The arg will be given to fn when it is executed.
For example,
T.closelets( [
  // First closelet
  {
    title: 'Hello',
    fn: function( arg ) { T( 'insert', { text: arg.message } ) },
    arg: { message: 'Hello' }
  },
  // Second closelet
  {
    title: 'World',
    fn: function( arg ) { T( 'insert', { text: arg.message } ) },
    arg: { message: 'World' }
  }
] );
This registers two closelets. When the user taps the close button of the web view, a closlet menu will appear by indicating "Close," "Hello," and "World" buttons. The "Close" button is always in the menu automatically to give the user a chance to decline to choose a closelet. If the user taps "Hello," the first closelet will be executed and a string "Hello" is inserted to the text view. If the user taps "World," the second closelet will be executed and a string "World" is inserted to the text view. (About the function T( 'insert', ... ) is described in the following section.)
Within the closelet function, you should execute the T() function in any way. T() function is for closing the web view from your code. It means that you should close the web view by yourself from the code because the user expects the web view to be closed when he/she taps the close button.
Also, each closelet function must complete the task and close the web view by executing T() in 3 seconds after the user chooses one from the closelet menu. After 3 seconds, Textwell force the web view to be closed if it is not closed yet.
Closelets are registered asynchronously, so that you should set callbackFn for something should be done after the registration is completed.
T.loadlets( arrayOfLoadletObject, callbackFn )
arrayOfCloseletObject: Array
callbackFn: Function
T.loadlets() registers a set of optional functions which can be executed when a next webpage is loaded in the web view. If some functions (loadlets) have been registered, a menu for the loadlets appears on the screen when the web view finishes loading a next webpage, then the user can choose one to execute it. The arrayOfLoadletObject is an array of loadlet objects. Each loadlet object should have three members with specific keys such as "title," "fn," and "arg."
loadlet object:
{
  'title': [title of loadlet],
  'fn': [loadlet function],
  'arg': {
    key: [value]
  }
}
'title': String
'fn': Function
'arg': Object which can be serialized as JSON
The title will be the label on the button in the loadlet menu. The fn is a function which will be executed if the user chooses that loadlet from the loadlet menu. The arg will be given to fn when it is executed.
For example,
T.loadlets( [
  // First loadlet
  {
    title: 'Show Title',
    fn: function( arg ) { alert( arg.text + document.title ) },
    arg: { text: 'Title is ' }
  },
  // Second loadlet
  {
    title: 'Show URL',
    fn: function( arg ) { alert( arg.text + location.href ) },
    arg: { text: 'URL is ' }
  }
], function() {
  // Callback
  location.href = 'http://www.apple.com/';
} );
This registers two loadlets, then accesses Apple.com website. When the Apple's homepage is loaded, a loadlet menu will appear by indicating "Show Title," "Show URL," and "Cancel" buttons. The "Cancel" button is always in the menu automatically to give the user a chance to decline to choose a loadlet. If the user taps "Show Title," the first loadlet will be executed, and the string "Title is Apple" is displayed in an alert dialog. If the user taps "Show URL," the second loadlet will be executed, and the string "URL is http://www.apple.com/" is displayed in an alert dialog.
Loadlets are registered asynchronously, so that you should set callbackFn for something should be done after the registration is completed.
When the loadlet menu appears, the "document.readyState" of the webpage has been "complete." It means that the loadlet menu appears after the web view finishes loading all the elements on the webpage, and the DOM is ready.
T.copy( text, callbackFn )
text: String
callbackFn: Function
T.copy() copies a text string to the paste board. Unlike the T( 'copy' ) command, this method doesn't close the web view. T.copy() is executed asynchronously, so that you should set callbackFn for something should be done after the copying is completed.
T.urlScheme( url )
url: String
T.urlScheme() tries to open the URL. The URL will be handled in the OS level instead of the web view level. It means that if you specify a URL which represents a webpage on the Internet, Safari comes to the front and shows that page instead of loading it in the web view. After executing this method, the web view doesn't close by itself. If you want the web view close after opening the URL, use T( 'urlScheme' ) command which is described in the following section.
T.request( settingsObject )
settingsObject: Object which can be serialized as JSON
T.request() makes an asynchronous URL request by the application native method.
Caution: The request must be made by "HTTPS" connection to meet the security requirement from iOS/macOS. The request which uses "HTTP" cannot be made by this method.
Because Textwell's embedded web view (WKWebView component of iOS/OS X) doesn't allow JavaScripts' XMLHttpRequest from the local environment, you cannot access any Web APIs or other online data asynchronously by using XHR in an action (unless it is delegated to your own online webpage). However, by using T.request(), you can request URL asynchronously and get the result to use in the action just like performing Ajax. In addition, unlike XMLHttpRequest, the cross-domain policy will not be applied to the request.
T.request() takes just one argument. The argument, settings object, has six members with specific keys such as "url," "type," "data," "headerData," "info," and "callback."
settings object:
{
  'url': [URL to request],
  'type': [method for the request],
  'data': {
    key: [value]
  },
  'headerData': {
    key: [value]
  },
  'info': {
    key: [value]
  },
  'callback': [callback function]
}
'url': String (required)
'type': String ( 'GET' or 'POST'. Default is 'GET' )
'data': Object which can be serialized as query parameters for GET request, or as JSON for POST request.
'headerData': Object which can be serialized as JSON for POST request. (Available on Textwell v2.3.2+)
'callback': Function
'info': Object which can be serialized as JSON
T.request() requests the specified "url".
The "type" must be "GET" or "POST". If you don't specify the type, the request uses "GET" method.
The "data" is an object to be sent to the server. It is converted to a query string and appended to the URL for GET requests. On the other hande, it is converted to a JSON string and sent as the body for POST requests. For GET requests, the object must be single hierarchy Key/Value pairs, which can be serialized as query parameters. Values are supposed to be string, number, or boolean.
The "headerData" is an object to be sent to the server for POST requests. It is converted to a JSON string and sent as the header. Keys and values must be string.
The "callback" is a function which will be executed after the server responds. The callback function is executed by taking an response object as the argument. You will parse it to use the responded data from the server.
The "info" is an object that will be passed optionally to the callback function. You can access the object in the callback with the "info" key of the response object. Because the variables in the info object are passed in by values instead of by reference, it is useful to avoid unexpected variable changing by other objects outside the closure.
response object:
{
  'status': [status code],
  'responseText': [responded text],
  'info': [optional object]
}
'status': Number
'responseText': String
'info': Object
Response object has three members, status, responseText, and info. The "status" is a HTTP status code. Usually you should check if it is 200 or not, to figure out the request was fulfilled or not. The "responseText" is the actual data you get from the server. The "info" is an object that is passed optionally from the settings object.
For example,
T.request( {
  url: 'https://www.yoursite.com/user-search.html',
  type: 'GET',
  data: {
    name: 'John',
    age: 18
  },
  info: {
    task: 'Search User'
  },
  callback: function( response ) {
    if ( response.status == 200 ) { // Success
      alert( response.responseText ); // Displays data responded from the server
    } else { // Error
      alert( 'Error: ' + response.task ); // Displays "Error: Search User"
    };
  }
} );
This requests the URL "https://www.yoursite.com/user-search.html" by GET method. The data will be converted to a parameter string as "name=John&age=18", and it is appended to the URL. When the server responds, the callback function will be executed with the argument (named "response" in this example). With the response object, first it checks the status code. If the code is 200, it handles the responded data which is represented by response.responseText.
T() function
As mentioned above, you need to execute T() function if you want to close the web view from your code. In other words, generally every action needs to execute T() function at the end of the action to get the user back to her/his text view. T() function runs asynchronously. T() function usually takes two arguments.
T( commandName, arg );commandName: String
arg: Object which has properties with specific names
The functionality of T() is determined by the command name. Many command names are reserved for Textwell's built-in features such as "clear," "email," "timeStamp," and so on. Besides that, the following command names are designed for general purpose, so that you can use them for your custom actions. Each command name requires a specific keys in its arg object (the second argument of T() function).
urlScheme
T( 'urlScheme', {
  url: [URL],
  option: [name of option (optional)]
} );
'url': String
'option': String
This command tries to open the specified URL after closing the web view. The URL will be handled in the OS level instead of the web view level. It means, for example, that if you specify a URL which represents a webpage on the Internet, Safari comes to the front and shows that page instead of loading the page within the embedded web view. (You can load a webpage within the embedded web view by calling location.href=aURL as a usual way.) Also you can execute any URL schemes which are available under your OS environment, like calling another application.
See "option property" for the detail of the option property.
error
T( 'error', {
  title: [error title],
  message: [error message]
} );
'title': String
'message': String
This command shows an error dialog after closing the web view. The title will be the title of the dialog. The message will be the message shown in the dialog.
done
T( 'done', {
  option: [name of option (optional)]
} );
'option': String
This command just closes the web view. See "option property" for the detail of the option property.
replace
T( 'replace', {
  text: [text to replace with]
} );
'text': String
This command closes the web view, then it replaces the entire text on the main text view with the specified text.
replaceWhole
T( 'replaceWhole', {
  text: [text to replace with]
} );
'text': String
This command closes the web view, then it replaces the entire text on the main text view with the specified text if there is no selection. If there is a selection, the selected text will be replaced with the specified text instead.
replaceCurrent
T( 'replaceCurrent', {
  text: [text to replace with]
} );
'text': String
This command closes the web view, then it replaces the current line, which has the caret now on, with the specified text if there is no selection. If there is a selection, the selected text will be replaced with the specified text instead.
insert
T( 'insert', {
  text: [text to insert]
} );
'text': String
This command closes the web view, then it inserts the specified text into the current caret position on the main text view. If there is a selection on the main text view, the selected text will be replaced with the specified text.
insertNext
T( 'insertNext', {
  text: [text to insert]
} );
'text': String
This command closes the web view, then it inserts the specified text into the next line on the main text view.
add
T( 'add', {
  text: [text to add]
} );
'text': String
This command closes the web view, then it appends the specified text to the end of the existing text.
replaceRange
T( 'replaceRange', {
  text: [text to replace with],
  replacingRange: {
    loc: [location of replacing range],
    len: [length of replacing range]
  },
  selectingRange: {
    loc: [location of selecting range],
    len: [length of selecting range]
  }
} );
'text': String
[ 'replacingRange' ][ 'loc' ]: Number
[ 'replacingRange' ][ 'len' ]: Number
[ 'selectingRange' ][ 'loc' ]: Number
[ 'selectingRange' ][ 'len' ]: Number
This command is for complex replacing. In addition to the inserting text, you can specify a range which is to be replaced and a range which is to be selected after replacement. For example, if the main text view has a string "Hello, world." as its content,
T( 'replaceRange', {
  text: 'Textwell',
  replacingRange: {
    loc: 7,
    len: 5
  },
  selectingRange: {
    loc: 0,
    len: 16
  }
} );
this will change the content as "Hello, Textwell." then selects the whole string. In this case, the replacing range { loc: 7, len: 5 }, which represents "world", is to be replaced with "Textwell", and the selecting range { loc: 0, len: 16 }, which represents "Hello, Textwell.", is to be selected after replacement.
copy
T( 'copy', {
  text: [text to copy]
} );
'text': String
This command just copies the specified text and stores it into the general paste board.
option property
Some commands accept "option" property within their argument object. The option property is to specify how Textwell copies, cuts, or clears the content of the main text view right after executing the action. There are 8 constants for the value of option property.
- 'none'
Does nothing. - 'copyWhole'
Copies the entire text or the selected text. - 'copyCurrent'
Copies the current line (which the caret is now on) or the selected text. - 'cutWhole'
Cuts the entire text or the selected text. - 'cutCurrent'
Cuts the current line (which the caret is now on) or the selected text. - 'clearWhole'
Clears the entire text or the selected text. - 'clearCurrent'
Clears the current line (which the caret is now on) or the selected text. - 'clearAll'
Clears the entire text.
For example, this is the source of the pre-installed "Clear Text" action:
T( 'done', {
  option: 'clearAll'
} );
This means that the web view is to be closed (by the "done" command), then the entire text on the main text view is to be cleared (by the "clearAll" option).
Basic Tutorial
The best sample of an action which gets some text from the text view as input, processes the string data, then returns the modified text back to the text view as output, is the "URL Encode" action. (You can import it from the Action Library.)
The source of "URL Encode" action is as the following code.
T( 'replaceWhole', {
  text: encodeURIComponent( T.whole )
} );
At first, you will know that this action executes T() function.
The T() function is taking two arguments. The first argument is a command name, and in this case, it's "replaceWhole."
"replaceWhole" command replaces the entire text with the specified text if there is no selection. If there is a selection, the selected text is to be replaced instead of the entire text.
The second argument is an object literal which has only one property "text." This value is to be inserted to the text view for replacing.
The value is specified by executing encodeURIComponent() which is a general function of JavaScript to URL-encode a text string.
The argument for the encodeURIComponent() is specified as T.whole. T.whole represents the entire text on the text view if there is no selection. If there is a selection, T.whole represents the selected text.
So this action is processed like this;
- Gets the entire text (or selected text).
- URL-encode it.
- Replace the entire text (or selected text) with the encoded text while closing the web view.
Delegating an action to your online webpage
Actions are executed within the embedded web view of Textwell app. The script which is written on the Textwell's source editor is going to be evaluated and runs directly in that local environment. However, alternatively, the scripts also can be written on your own webpages that are on the Internet.
Because the Textwell's embedded web view is a kind of web browser, you can redirect users to your own webpage by "location.href = your-own-page" within the web view. So if you prepare some scripts on the page, they will run within the Textwell's web view. However, actions cannot be very useful if they don't have the T object and T() function because without them, you cannot take user's text into your script, and you cannot get some results back to users text view.
Fortunately, inside the Textwell's web view, there is a way to inject T object and T() function to the JavaScript's namespace of your webpage, so that the actions can be delegated to the online environment.
Having the source of an action on the Web is sometimes better than having it in Textwell's local instances for the following reasons.
- If you are making actions and sharing them with people, it is much easier to update them if they are on the Web.
- You can use the server-side technologies such as PHP or MySQL to empower your action easily.
In fact, some official actions such as "Markdown Preview," "Reorder," "Shorten URL," eBook," "Twitter," and more are using this web-delegate technique behind the curtain. Those actions have been updated several times without asking users to import them again from the library. Also they are using server-side script, database, or OAuth connection. Those are the power of web-delegated actions.
Injecting T to your webpage
To inject T object and T() function to your webpage, use the following method.
In your online webpage
<script>
  window.webkit.messageHandlers.initT.postMessage( initializerName );
</script>
initializerName: String
The "window.webkit.messageHandlers" is an embedded member of the WebKit. The "initT" is a reserved member as a message handler which is set by Textwell itself. "postMessage" is also a reserved method of the message handler to let the script call a native-side method. initializerName should be the name of your function which is to be called back after injection is completed. In other words, in that function, you can access T object and execute T() function.
Sample Code
In your online webpage: http://www.yoursite.com/action.html
<script>
function doAction() {
  alert( T.current );
  T( 'done' );
};
window.webkit.messageHandlers.initT.postMessage( 'doAction' );
</script>
Textwell's action source
location.href = 'http://www.yoursite.com/action.html';The action first accesses to your webpage (http://www.yoursite.com/action.html), then Textwell injects T under the JavaScript's "window" namespace, and then it executes "doAction" function. In the "doAction" function, you can use T object and T() function.
"postMessage" method requires an argument. If you don't need to execute any function after Textwell injects T, you will give "null" to the "postMessage" method.
Passing data to the injected T
You can access T object in your online script by using the technique described above. As the T object's members, you can get T.text, T.current, or T.whole and so on, but how do you pass other kinds of data to your online script?
Of course you may use some URL parameters just as a usual way. However, it is easier to use T.setData() and T.data. In the local environment, which means Textwell's action source editor, you can set data by using T.setData( key, value, callbackFn ). After accessing your online webpage and injecting T, you can get the data by using T.data[ key ] within your online script.
In your online webpage: http://www.yoursite.com/action.html
<script>
function doAction() {
  alert( T.data[ 'name' ] ); // Displays "John"
  T( 'done' );
};
window.webkit.messageHandlers.initT.postMessage( 'doAction' );
</script>
Textwell's action source
T.setData( 'name', 'John', function() {
  location.href = 'http://www.yoursite.com/action.html';
} );
Debugging Actions
On Mac version of Textwell, you can debug your actions (JavaScript, DOM, HTML, or CSS) by using Web Inspector, which is built in Textwell's web view, just like the way you debug web contents with Safari. (macOS 10.12 Sierra or higher is required.)
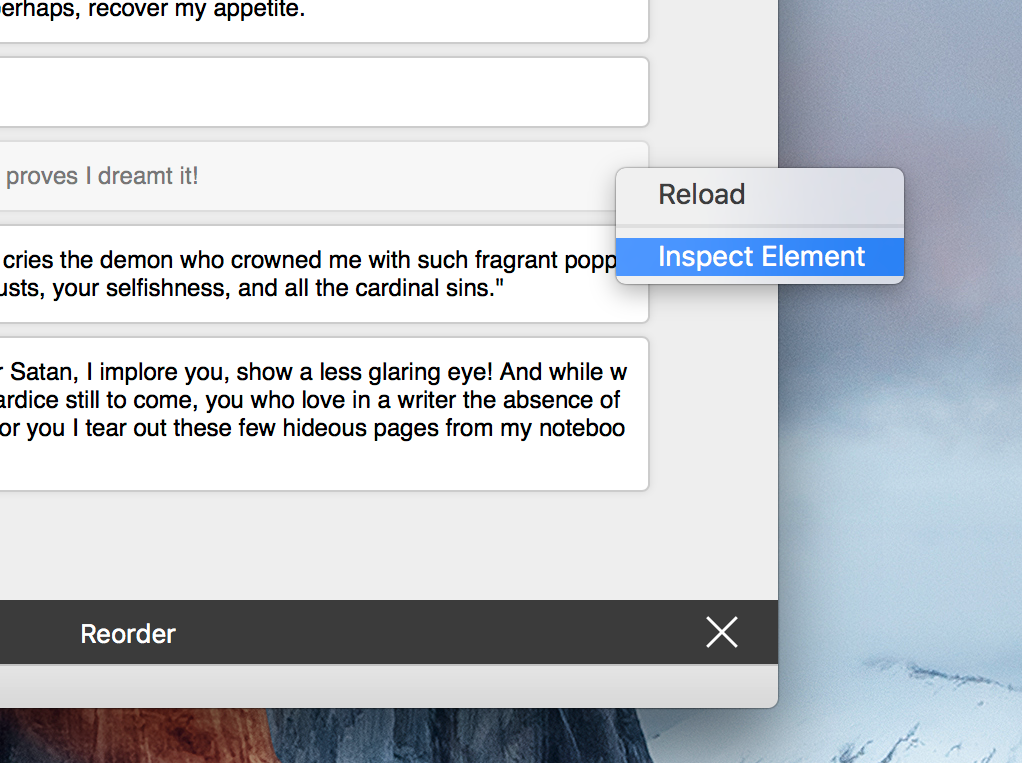
Opening Web Inspector
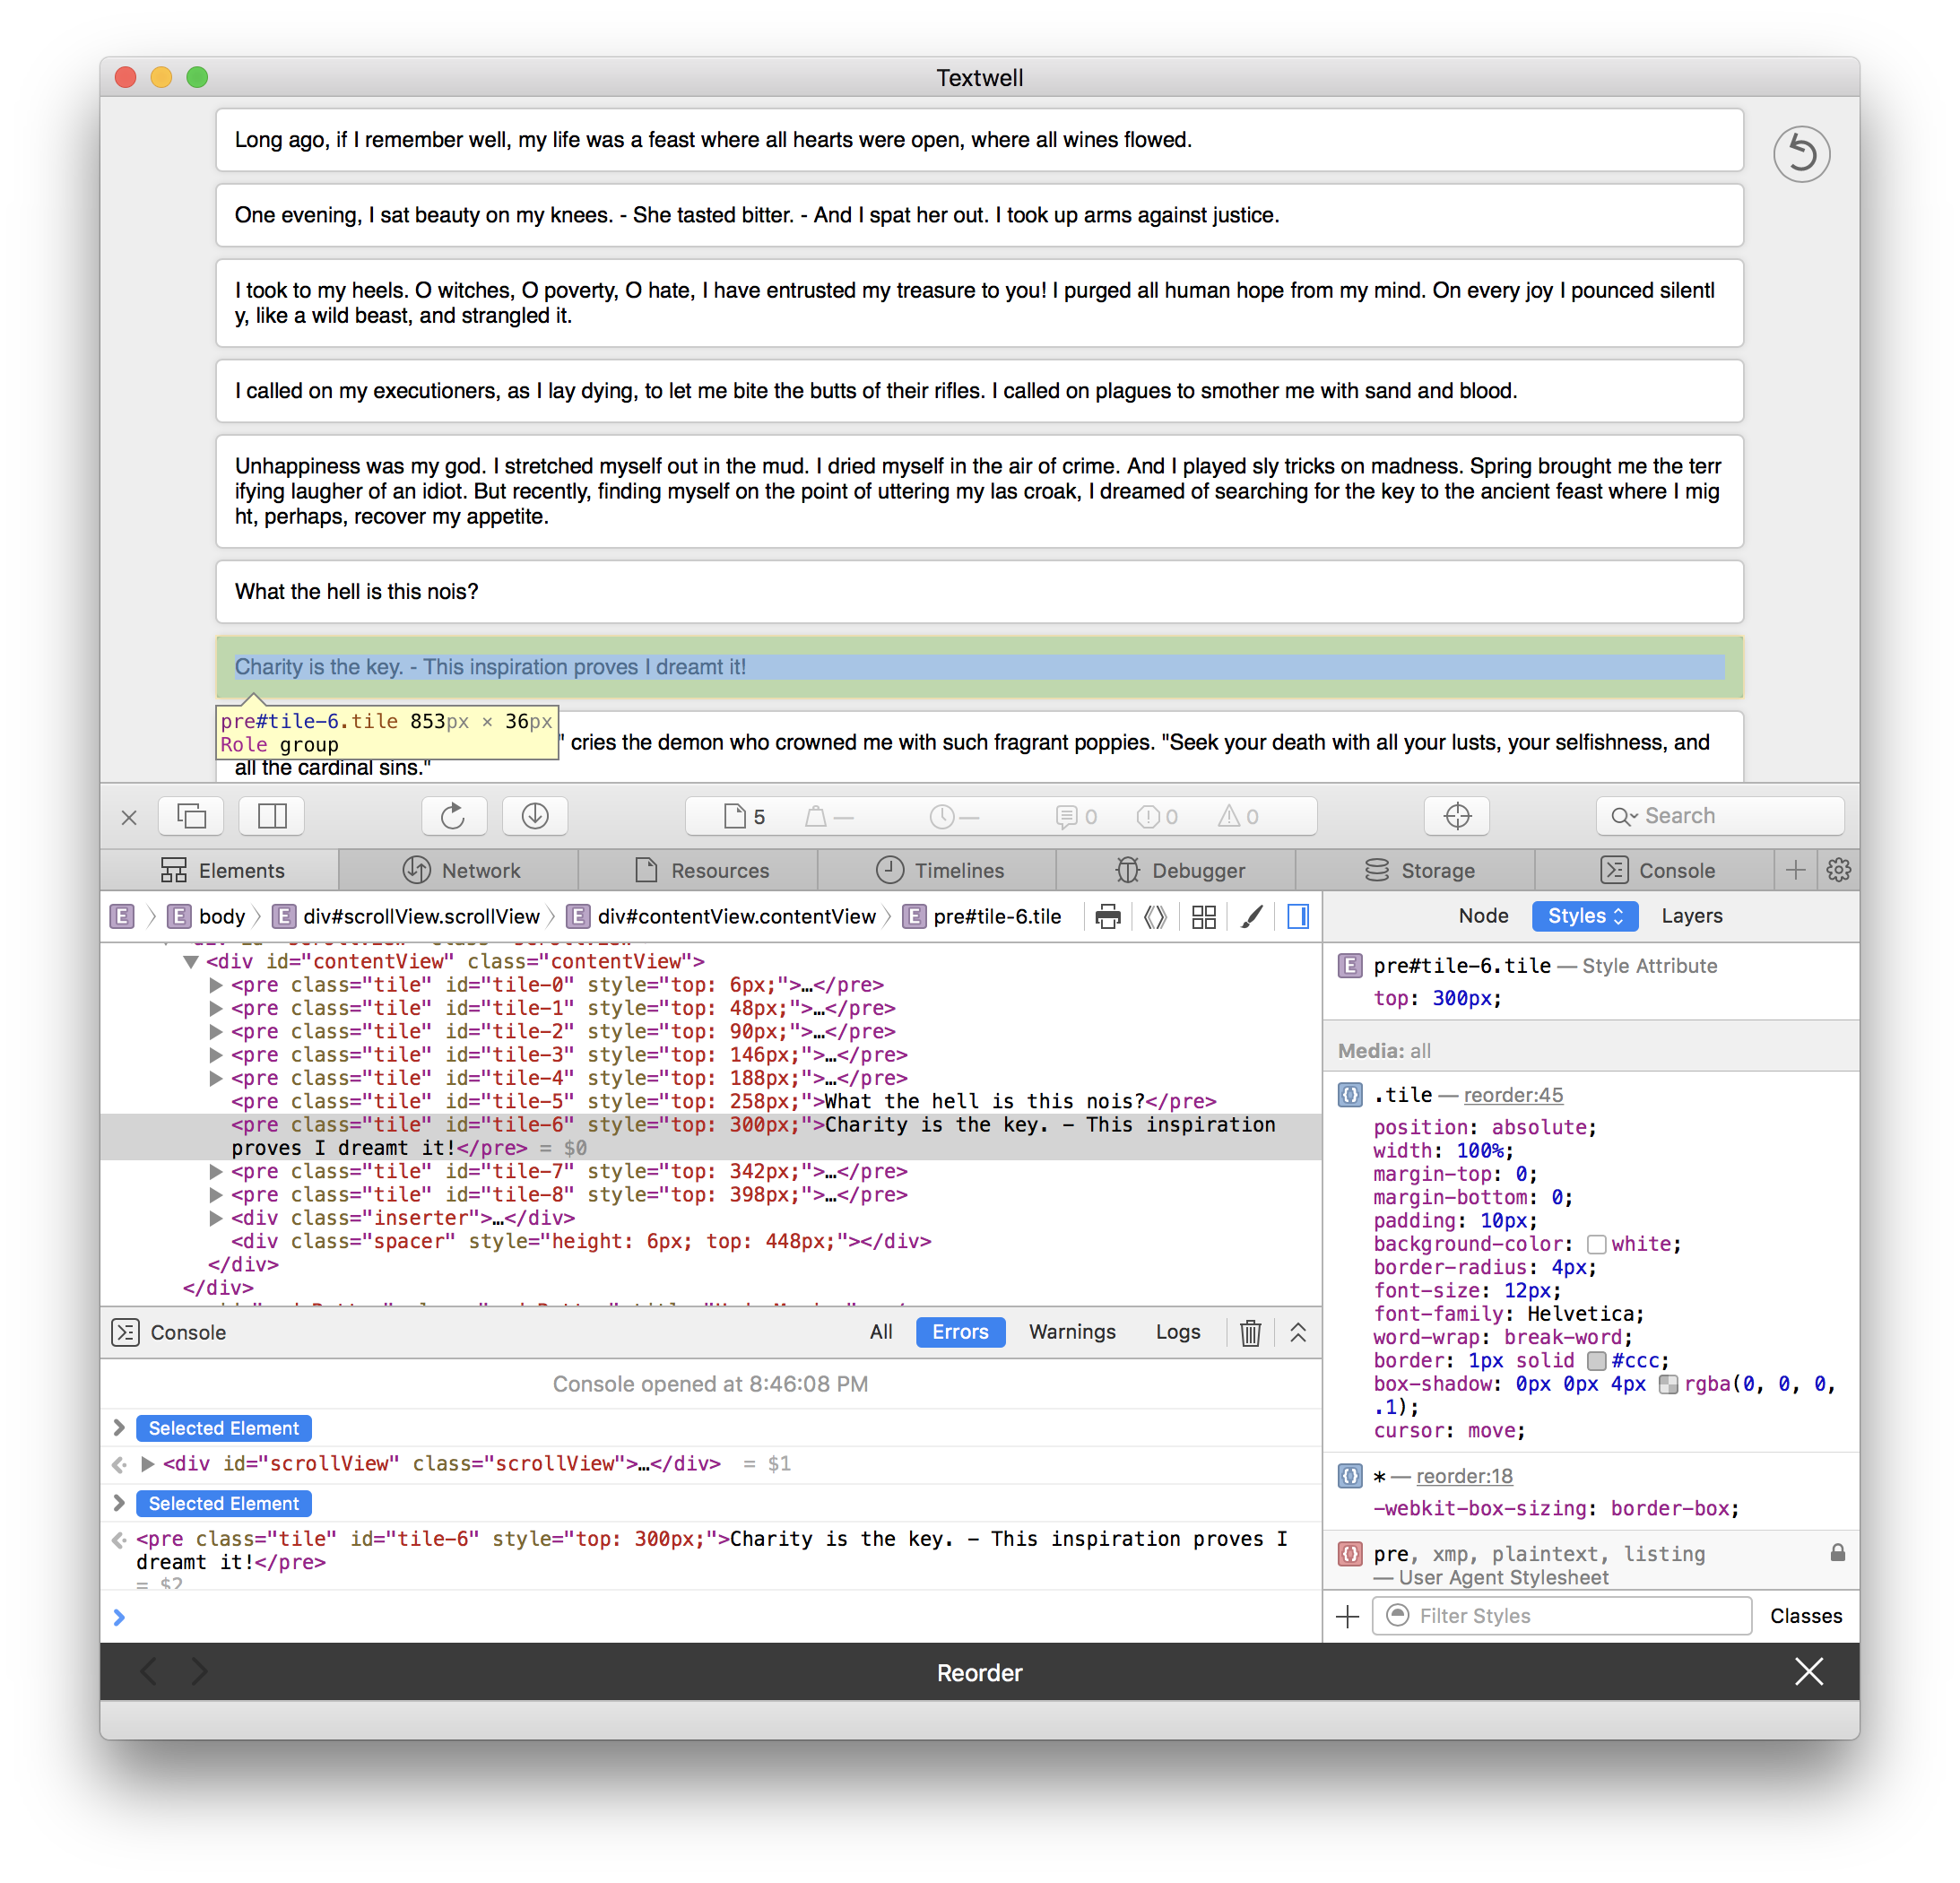
On Textwell's web view, Web Inspector can be opened by control-click/right click on a webpage and choose "Inspect Element" from the contextual menu, unless the action is running in translucent mode.
Once Web Inspector is opened, you can inspect your JavaScript, DOM, HTML, CSS, and so on with it. Especially, using breakpoints or debugger statement to try step execution is very efficient for debugging JavaScript.
Web Inspector closes automatically when the web view closes.
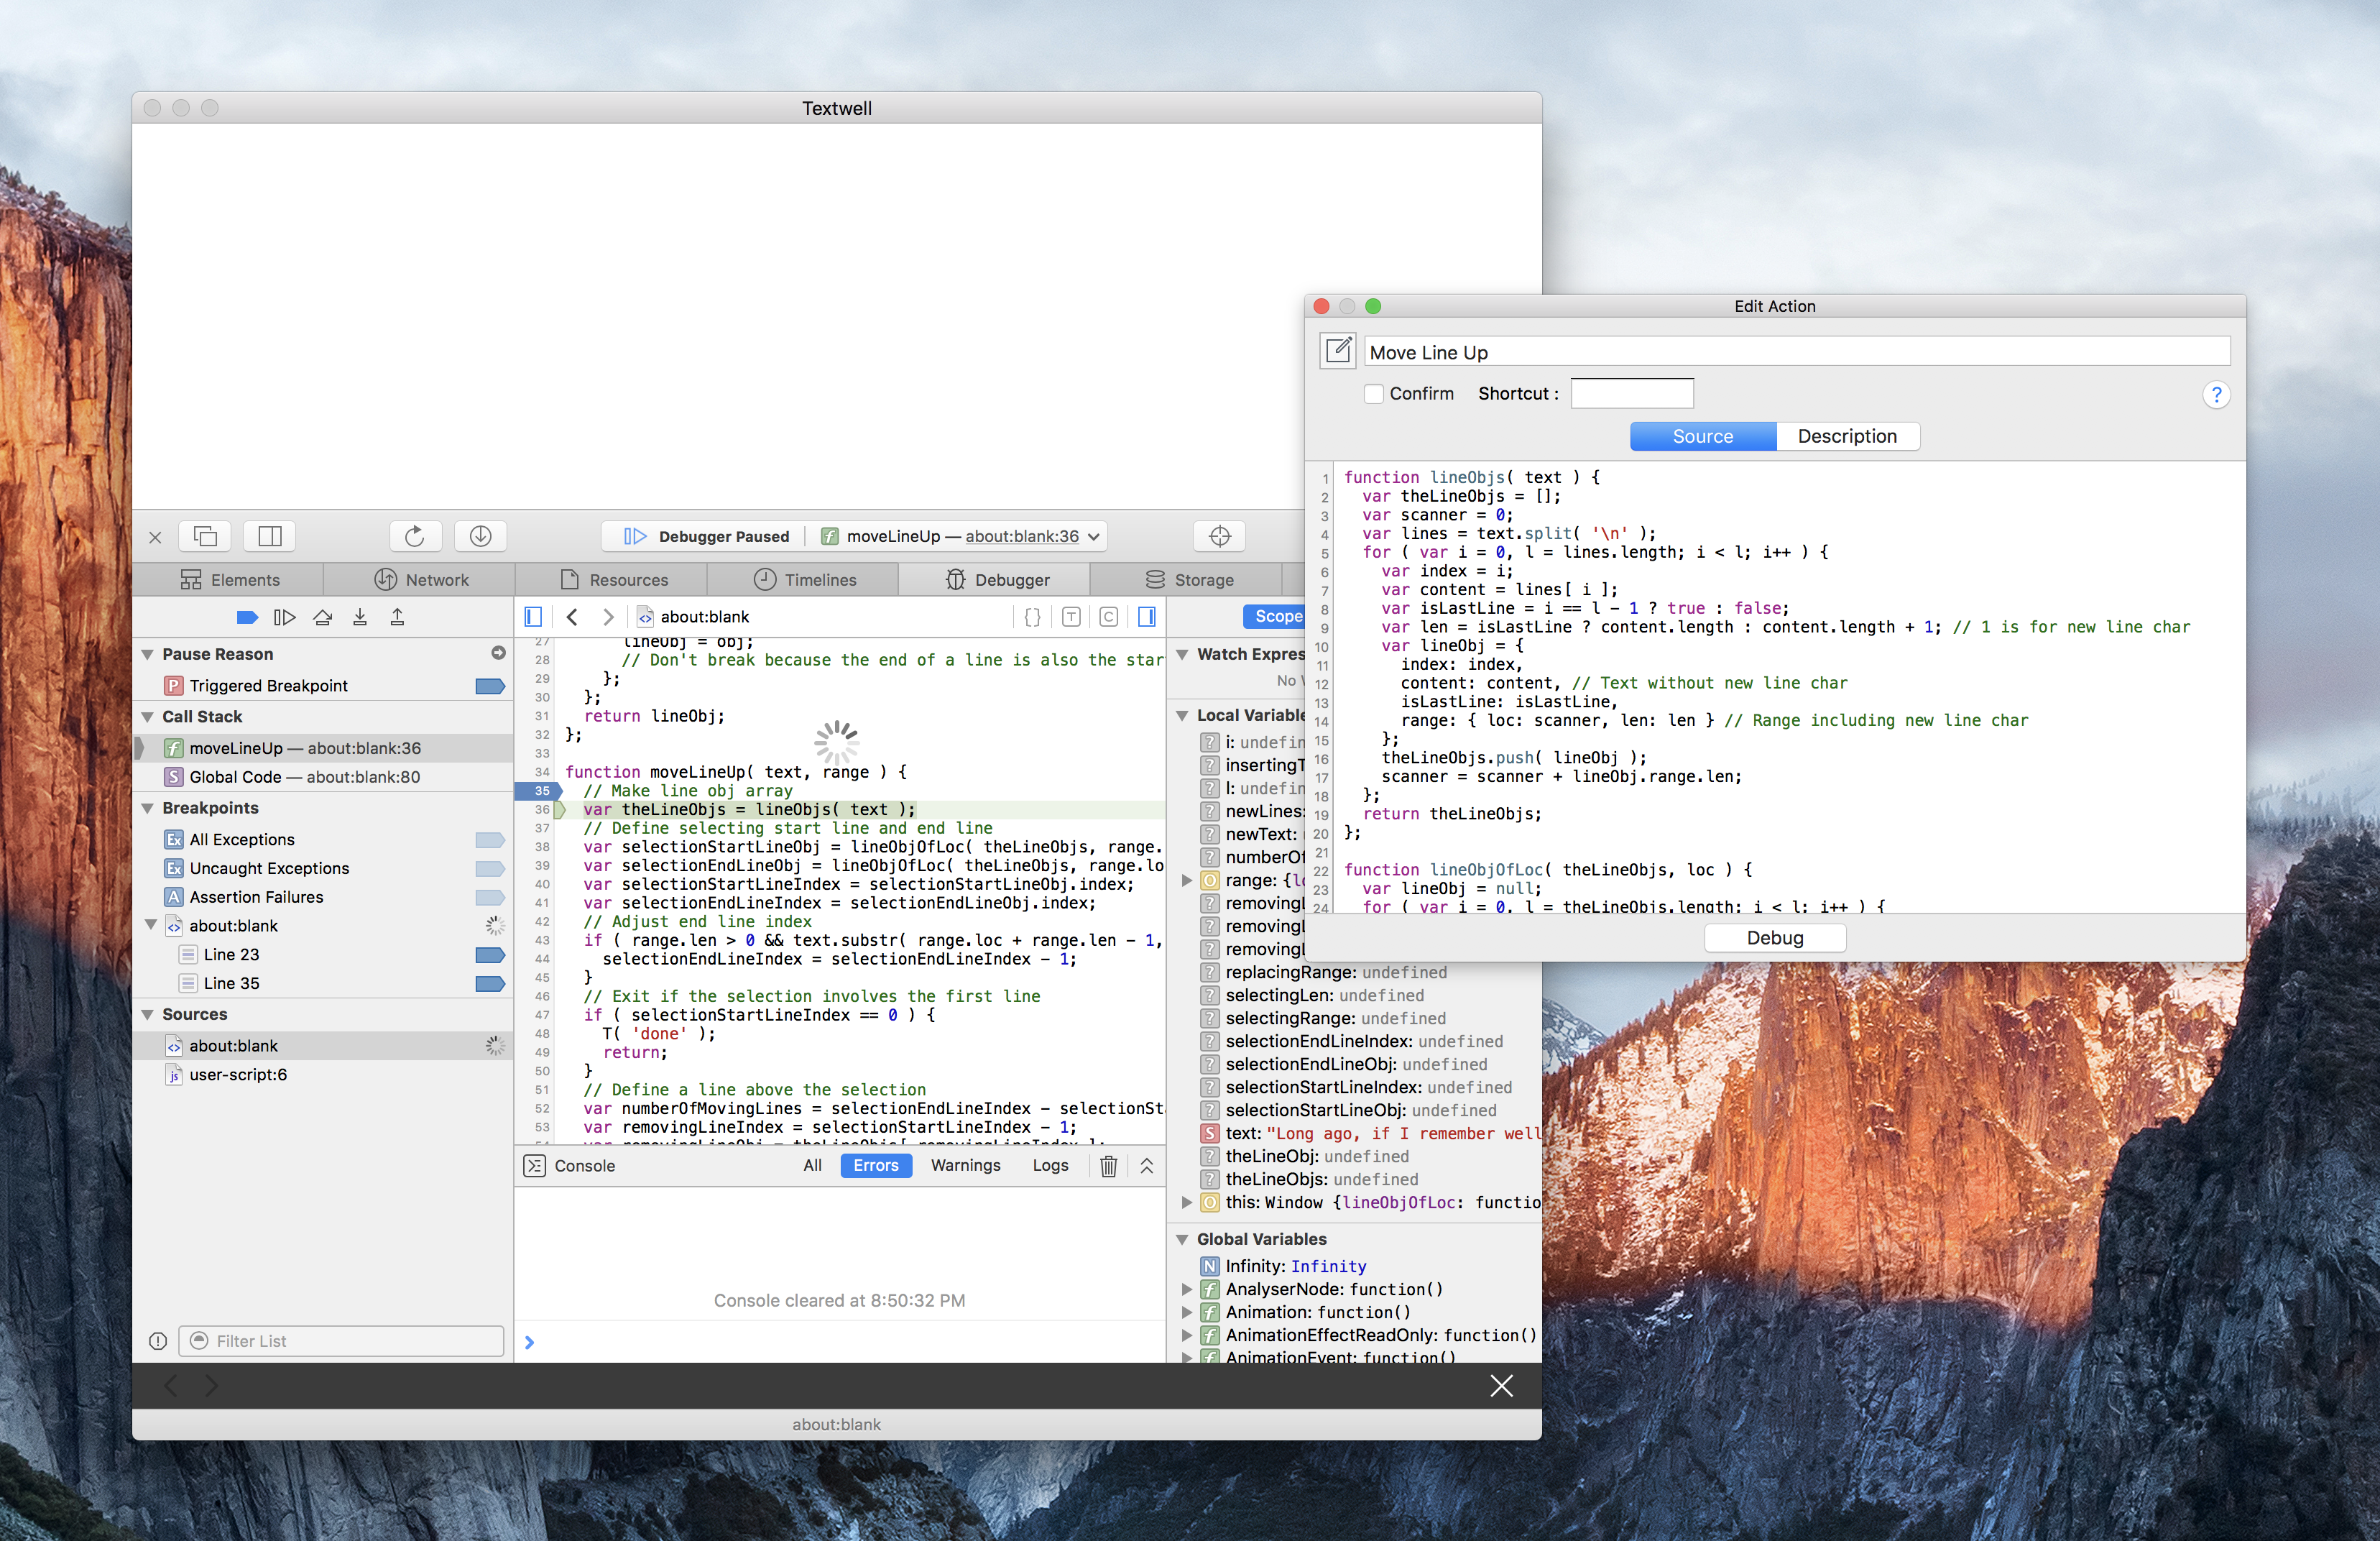
Executing Web View in Debugging Mode
As described above, you need to control-click/right click on a webpage to open Web Inspector. However, if an action is running in translucent mode, control-click/right click is not available. Also, the web view closes right after an action executes T() function, so that it is very difficult to open Web Inspector if the action finishes its process in a short time.
In such cases, starting the web view in debugging mode will help. To start the web view in debugging mode;
- Select an action on the Action pane (the right pane) and open the action editor window by choosing "Action > Edit Action" from the menubar.
- On the action editor window, press "option" key and hit the "Debug" button. (Pressing option key makes the "Execute" button turn into "Debug" button.)
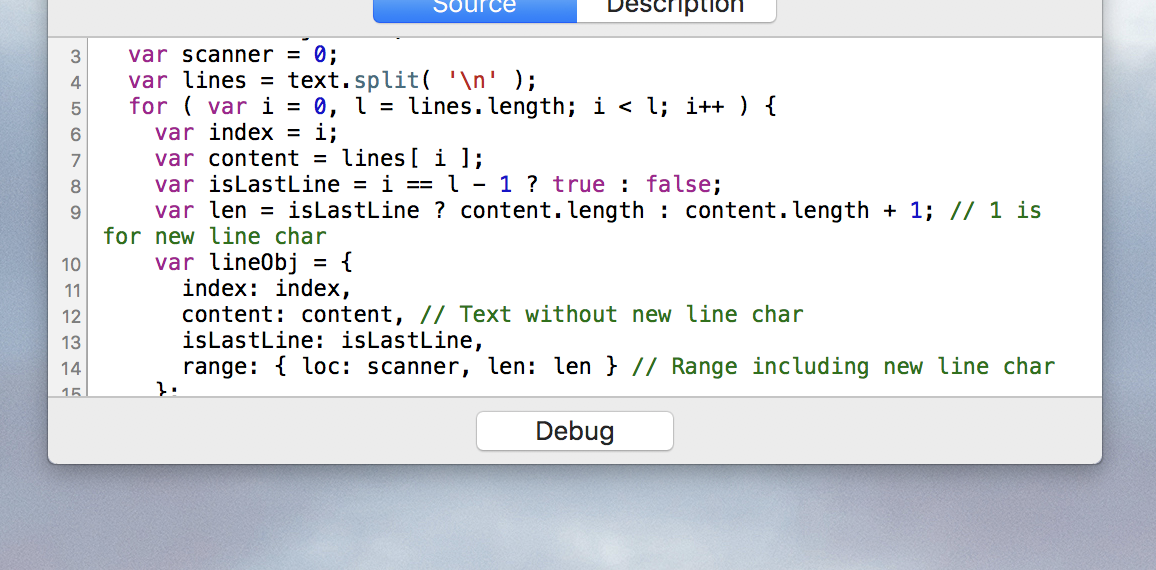
By hitting the "Debug" button, the web view starts in debugging mode. The web view keeps the mode until it is closed by pressing X button or choosing "Action > Quit Action" from the menubar.
In debugging mode, the web view behaves like;
- the action runs in visible mode even if it has no HTML markups, so that you can control-click/right click on the webpage to open Web Inspector.
- Executing T() function is canceled, so that the web view will not be closed programmatically from the action source.
- Once the web view starts in debugging mode, it keeps the mode until you close the web view by pressing X button or choosing "Action > Quit Action" from menubar. It means that you can modify your source on the editor window or add some breakpoints in Web Inspector then hit the "Debug" button again and again for debugging without getting out the mode.
- The 3-second-rule of T.closelets() is not applied, so that you can debug inside the closelet actions.